 Last week we began to look in detail at the backgrounds of some of the iPhone’s built-in shiny buttons. We saw that those backgrounds were really simulated 3-D grooves in the control’s parent’s surface, and that they were comprised of two elements: A “moat”, making up the bulk of the background, and a 1-pixel “edge” at the perimeter of the control. We also saw how to render a moat, so, this week, we’ll look at rendering an edge, and at compositing a complete button image.
Specular
The edge appears deceptively simple; at first, it might look like a simple gray border. In fact, it appears to be rendered with a gradient, intended to simulate the interaction of a light source with a sharp bend in a shiny surface. This isn’t too much of a problem, as we’ve rendered a lot of gradients in this project.
Toroid
The other major characteristic of the edge is its shape; it’s hollow. This isn’t a particularly good fit for the simple clipping paths we’ve been using; we would either have to cook up something new, or accept the inefficiency of redrawing the bulk of the pixels in the button 3 times. (Once for the edge gradient, once for the moat gradient, and once for the button gradient.) Until I see a convincing reason to feel otherwise, I’m feeling a lot of love for the simplicity of inefficiency.
El-Hacko
If we (a.) once again ignore the problem of dynamically determining the gradient’s begin and end colors (and just hard-code something that looks decent) and (b.) aren’t too picky about the shape of the gradient, we can reuse the drawGrooveRect function from last week, generalizing it slightly:
static void calc_groove_color(void* info, const float* in, float* out)
{
GlossyParams* params = (GlossyParams*) info;
float progress = *in;
progress = params->expScale * (expf((1.0 - progress) * -params->expCoefficient) - params->expOffset);
out[0] = params->color[0] * (1.0 - progress) + params->caustic[0] * progress;
out[1] = params->color[1] * (1.0 - progress) + params->caustic[1] * progress;
out[2] = params->color[2] * (1.0 - progress) + params->caustic[2] * progress;
out[3] = params->color[3] * (1.0 - progress) + params->caustic[3] * progress;
}
+ (void)drawGrooveRect:(CGRect)rect fromIntensity:(CGFloat)from toIntensity:(CGFloat)to inContext:(CGContextRef)context
{
static const float EXP_COEFFICIENT = 2.0;
static const CGFloat normalizedRanges[8] = {0, 1, 0, 1, 0, 1, 0, 1};
static const CGFunctionCallbacks callbacks = {0, calc_groove_color, NULL};
// Prepare gradient configuration struct
GlossyParams params;
// Set the base color
params.color[0] = from;
params.color[1] = from;
params.color[2] = from;
params.color[3] = 1;
// Set the 'caustic' color
params.caustic[0] = to;
params.caustic[1] = to;
params.caustic[2] = to;
params.caustic[3] = 1;
// Set the exponent curve parameters
params.expCoefficient = EXP_COEFFICIENT;
params.expOffset = expf(-params.expCoefficient);
params.expScale = 1.0/(1.0 - params.expOffset);
CGColorSpaceRef colorSpace = CGColorSpaceCreateDeviceRGB();
CGFunctionRef function = CGFunctionCreate(¶ms, 1, normalizedRanges, 4, normalizedRanges, &callbacks);
CGPoint sp = CGPointMake(CGRectGetMidX(rect), CGRectGetMaxY(rect));
CGPoint ep = CGPointMake(CGRectGetMidX(rect), CGRectGetMinY(rect));
CGShadingRef shader = CGShadingCreateAxial(colorSpace, sp, ep, function, NO, NO);
CGFunctionRelease(function);
CGColorSpaceRelease(colorSpace);
CGContextDrawShading(context, shader);
CGShadingRelease(shader);
}Test Code
If we add this function to the Glossy category of UIButton that we defined earlier, we can generate some test images with the following code. (Again, this test code is designed to be added to a view controller of your own devising):
- (CGContextRef)currentImageContextWithWidth:(NSUInteger)width height:(NSUInteger)height
{
	// Create and get a pointer to context
	UIGraphicsBeginImageContext(CGSizeMake(width, height));
	CGContextRef context = UIGraphicsGetCurrentContext();

	// Convert co-ordinate system to Cocoa’s (origin in UL, not LL)
	CGContextTranslateCTM(context, 0, height);
	CGContextConcatCTM(context, CGAffineTransformMakeScale(1, -1));

	// Set fill and stroke colors
	CGContextSetFillColorWithColor(context, [[UIColor colorWithRed:0.65 green:0.85 blue:0.85 alpha:1] CGColor]);
	CGContextSetStrokeColorWithColor(context, [[UIColor colorWithRed:70.0/255 green:70.0/255 blue:70.0/255 alpha:1] CGColor]);

	// Return context
	return context;
}
- (UIImage*)imageFromCurrentContext
{
	UIImage* image = UIGraphicsGetImageFromCurrentImageContext();
	UIGraphicsEndImageContext();
	return image;
}
- (UIImageView*)testImageWithWidth:(NSUInteger)width height:(NSUInteger)height color:(UIColor*)color
{
	CGContextRef context = [self currentImageContextWithWidth:width height:height];

	// Draw edge gradient
	[UIButton setPathToRoundedRect:CGRectMake(0, 0, width, height) forInset:0 inContext:context];
	CGContextClip(context);
	[UIButton drawGrooveRect:CGRectMake(0, 0, width, height) fromIntensity:61.0/255.0 toIntensity:82.0/255.0 inContext:context];

	// Draw moat gradient
	[UIButton setPathToRoundedRect:CGRectMake(1, 1, width-2, height-2) forInset:1 inContext:context];
	CGContextClip(context);
	[UIButton drawGrooveRect:CGRectMake(1, 1, width-2, height-2) fromIntensity:0.0 toIntensity:34.0/255.0 inContext:context];

	// Draw button image
	[UIButton setPathToRoundedRect:CGRectMake(4, 4, width-8, height-8) forInset:4 inContext:context];
	CGContextClip(context);
	[UIButton drawGlossyRect:CGRectMake(4, 4, width-8, height-8) withColor:color inContext:context];

	// Build and return image
	UIImageView* imageView = [[[UIImageView alloc] initWithImage:[self imageFromCurrentContext]] autorelease];
	[self.view addSubview:imageView];
	return imageView;
}

// Implement loadView to create a view hierarchy programmatically, without using a nib.
- (void)loadView
{
	// TL view
	self.view = [[UIView alloc] initWithFrame:CGRectZero];
	self.view.backgroundColor = [UIColor blackColor];

	// Create buttons
	[self testImageWithWidth:310 height:54 color:[UIColor colorWithRed:0.50 green:0.05 blue:0.05 alpha:1]].center = CGPointMake(160, 54);
	[self testImageWithWidth:310 height:54 color:[UIColor colorWithRed:0.05 green:0.50 blue:0.05 alpha:1]].center = CGPointMake(160, 162);
	[self testImageWithWidth:310 height:54 color:[UIColor colorWithRed:0.05 green:0.05 blue:0.50 alpha:1]].center = CGPointMake(160, 270);
}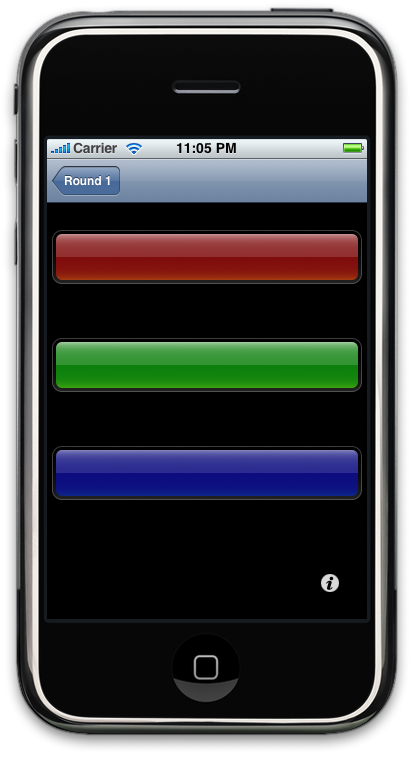
The results, I hope you’ll agree, are creditable.
Next week we’ll look at generating the colors used in the backgrounds dynamically, and rolling the whole endeavour into the Glossy category of UIButton.
