
As a followup to my earlier post on a “helper” view controller that handled the editing of long text fields, today I present a utility class that handles the editing of date fields. I hope you find it interesting.
The Goal
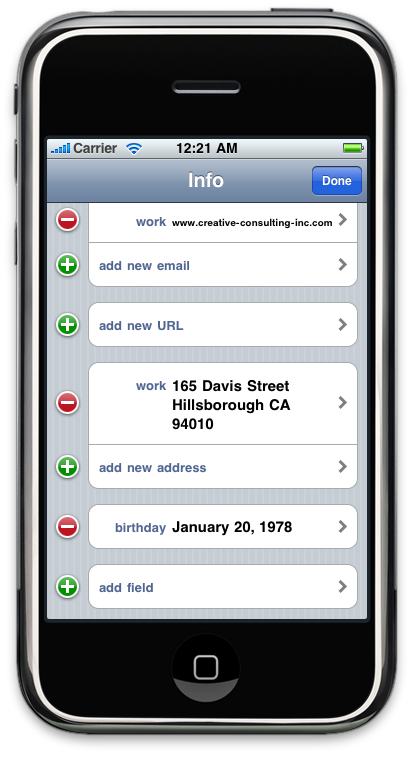
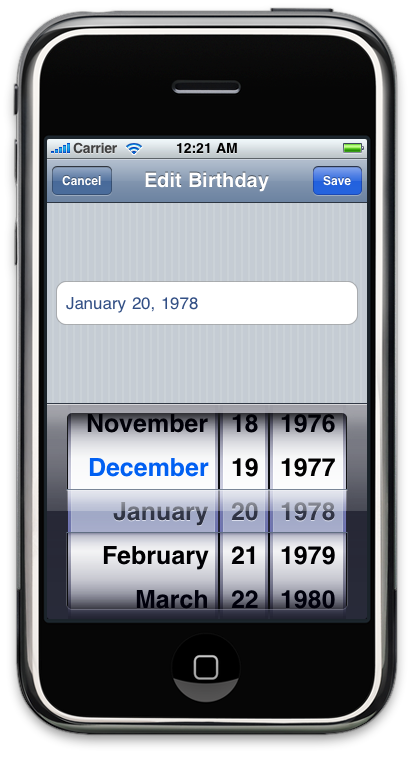 What we’re aiming for is something like the sequence of screens you see in the “birthday” section of the iPhone “Contacts” app. First (as you can see to the left) you’re shown a non-editable “display” row; when you tap on that row, an editable view slides in from the right. I wanted to create a class that made it as easy as possible to generate those editable views.
NIB
The NIB for this class is a little more complicated that that used by the TextEdit class; I provide a copy here, and a brief description of its layout below.
The NIB’s “File Owner” is a DateEdit object. (The DateEdit class is defined in the next section.) The NIB contains 4 UI objects: Its base (320×416) UIView contains two child views: A (320×416) UITableView at (0, 0), and a (320×216) UIDatePicker at (0, 200). The UITableView is configured with a “Grouped” style, and assigned a 44px row height and a 78px header height – the latter vertically centers the table’s single row above the date picker. The UIDatePicker is configured with a “Date” mode. The final UI element, the UITableViewCell, is just a stock (320×44) element; it’s a sibling of the base UIView.
Here’s a quick summary of the relevant connections:
- The
UITableView'sdataSourceanddelegateare connected to the NIB’s “File Owner”. - The
UIDatePicker's“Value Changed” event is connected to thechangeDateaction of the NIB’s “File Owner”. - The NIB’s “File Owner’s”
viewis connected to the baseUIView. - The NIB’s “File Owner’s”
displayCellis connected to theUITableViewCell. - The NIB’s “File Owner’s”
datePickeris connected to theUIDatePicker.
Code
The code is a little longer than that of the TextEdit class, but it’s not too bad. Here’s the header:
//
//  DateEdit.h
//
//  Created by Michael Heyeck on 11/29/09.
//

#import <UIKit/UIKit.h>


@interface DateEdit : UIViewController <UITableViewDataSource, UITableViewDelegate>
{
	NSDateFormatter*	printFormatter;

	id			object;
	NSString*		keyPath;

	UITableViewCell*	displayCell;
	UIDatePicker*		datePicker;
}

@property (nonatomic, retain) id object;
@property (nonatomic, retain) NSString* keyPath;

@property (nonatomic, retain) IBOutlet UITableViewCell* displayCell;
@property (nonatomic, retain) IBOutlet UIDatePicker* datePicker;

- (IBAction)changeDate;

@end
and here’s the implementation:
//
//  DateEdit.m
//
//  Created by Michael Heyeck on 11/29/09.
//

#import "DateEdit.h"


@interface DateEdit ()

@property (nonatomic, retain, readonly) NSDateFormatter* printFormatter;

- (void)save;
- (void)dismiss;

@end


@implementation DateEdit

@synthesize object;
@synthesize keyPath;
@synthesize displayCell;
@synthesize datePicker;

- (NSDateFormatter*)printFormatter
{
	if (!printFormatter)
	{
		printFormatter = [[NSDateFormatter alloc] init];
		printFormatter.dateFormat = @"d MMMM yyyy";
	}
	return printFormatter;
}


- (void)viewDidLoad
{
	[super viewDidLoad];

	// Add buttons
	self.navigationItem.leftBarButtonItem = [[[UIBarButtonItem alloc] initWithBarButtonSystemItem:UIBarButtonSystemItemCancel target:self action:@selector(dismiss)] autorelease];
	self.navigationItem.rightBarButtonItem = [[[UIBarButtonItem alloc] initWithBarButtonSystemItem:UIBarButtonSystemItemDone target:self action:@selector(save)] autorelease];

	// Initialize control
	[datePicker setDate:[object valueForKeyPath:keyPath] animated:NO];

	// Initialize display
	displayCell.textLabel.text = [self.printFormatter stringFromDate:datePicker.date];
}


- (IBAction)changeDate
{
	displayCell.textLabel.text = [self.printFormatter stringFromDate:datePicker.date];
}


- (void)dealloc
{
	[printFormatter release]; printFormatter = nil;
	self.object		= nil;
	self.keyPath		= nil;
	self.displayCell	= nil;
	self.datePicker		= nil;
	[super dealloc];
}

#pragma mark Table view data source methods

// Customize the number of rows in the table view.
- (NSInteger)tableView:(UITableView*)tableView numberOfRowsInSection:(NSInteger)section
{
	return 1;
}


// Customize the appearance of table view cells.
- (UITableViewCell*)tableView:(UITableView*)tableView cellForRowAtIndexPath:(NSIndexPath*)indexPath
{
	return displayCell;
}

#pragma mark Table view delegate methods

- (NSIndexPath*)tableView:(UITableView*)tableView willSelectRowAtIndexPath:(NSIndexPath*)indexPath
{
	return nil;
}

#pragma mark Extension methods

- (void)save
{
	[object setValue:datePicker.date forKeyPath:keyPath];
	[self dismiss];
}


- (void)dismiss
{
	[self.navigationController popViewControllerAnimated:YES];
}

@end
Usage
This class is designed to allow the editing of an NSDate property of a Key-Value Coding compliant object. It expects that it will be pushed onto a UINavigationController's stack for display. Here’s an example of how it might be used to edit the “date” field of an object, which holds a “Birthday”:
- (void)editBirthday
{
	// Create a new controller
	DateEdit* de = [[DateEdit alloc] initWithNibName:@"DateEdit" bundle:nil];

	// Configure the new controller
	de.title = @"Birthday";
	de.object = someObject;
	de.keyPath = @"date";

	// Present the "edit" controller
	[self.navigationController pushViewController:de animated:YES];

	// Clean up
	[de release];
}
The parent view controller (i.e. the object containing the editBirthday method) should use Key-Value Observing to update its views to reflect changes made to someObject by the DateEdit view controller.
Caveats
As with TextEdit, the biggest shortcoming of this class lies in its handling of its object and keyPath properties; the class assumes that these properties are set before the view is loaded, and that they do not change during the lifetime of the view controller. This is a little sloppy, but I don’t anticipate it causing any difficulty for my purposes. YMMV.
