There’s a bit of a chicken/egg problem with selling an app on iTunes: In the absence of a big marketing push, it’s pretty hard to persuade people to pay for something based only on some ad copy and a few screenshots. (It’s not even that easy to persuade people to try an app, but that’s another matter.) The usual solution is to offer a “Lite” version of an app that people can download and try for free; the idea is that the free demo will induce them to either pay for a full version, or unlock additional features with in-app purchases.
The problem with “Lite” versions is that they’re, well, additional versions that have to be maintained, built, tested, and so forth. This can be a considerable hassle if done wrong, but, fortunately, Xcode contains some features that make the maintenance of a “Lite” version almost painless. Today I’ll walk through the steps involved in configuring a project to build such a version.
Administrivia
First, let me say that this article is written around Xcode 3.2.4; some of the steps here are a little fiddly, and some things (such as the exact names of fields) may change from version to version of Xcode.
Second, credit where it’s due: this post is heavily based on (really, almost more of a commentary on) this post from the Omegasoft blog. It grew out of the notes I made while following the instructions in the original post.
Step 1
Duplicate your project’s target by opening the “Targets” folder in the “Groups & Files” panel, right-clicking the target therein (there should only be one) and selecting “Duplicate” from the context menu. Rename the new project “App Lite”, or something equally appropriate.
Step 2
A new “Info.plist” style file should have appeared in the “Resources” folder when the target was duplicated; this file will probably be named “Info copy.plist”, or something like that. You’ll probably want to rename this to something more appropriate. This procedure can actually pose a small problem, in the form of this dialog box:
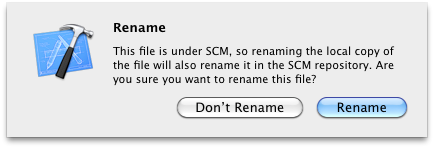
The problem is that the newly created .plist isn’t yet under SCM, and, in my experience, clicking “Rename” in such a case will crash Xcode. (Clicking “Don’t Rename”, of course, prevents you from renaming the file.) I usually resolve this by dropping to the console and doing an “svn add” on the new file, then doing the rename in Xcode, clicking the “Rename” button when this dialog is presented. (I don’t remember why I use the console — rather than Xcode — to do the add; there was apparently some problem in the past that seemed to make it a good idea.)
Step 3
The Omegasoft post suggests that you change the “Bundle identifier” in the new .plist to a new identifier; I do not do this, leaving it set to (something like):
com.yourcompany.${PRODUCT_NAME:identifier}(This works because, contra the original post, we’ll be changing the PRODUCT_NAME of the “Lite” version.)
I do suggest that you change the “Bundle display name” in the new .plist to reflect the “liteness” of the new version.
Step 4
The original post suggests that this is a good time to add a “Lite” icon to the project, and to set the new file as the value of the “Icon file” parameter in the new .plist file.
I actually skipped this step, partially out of laziness, and partially because my “Lite” and “Full” versions are functionally equivalent; more precisely, a user can unlock full functionality in the “Lite” version for the same cost as buying the “Full” version outright. Since there’s no difference between the unlocked “Lite” and the “Full” version, I opted to use the same icon for both. Also, you know: laziness.
Step 5
Configure the new target’s properties. Begin by right-clicking it, selecting “Get Info” from the context menu, going to the “Build” tab, and setting the “Configuration” dropdown to “All Configurations”, and the “Show” dropdown to “All Settings”. Next, scroll down to the “Packaging” group, and set the “Info.plist file” parameter to the name you chose in Step 2. (Note that, in my version of Xcode, this parameter had been automatically set to the original name of the newly-created .plist file.)
At this point I also like to change the “Product Name” parameter (also in the “Packaging” group) to something else, e.g. “AppLite”. The Omegasoft post refers to this (or to something like this) as a “Gotcha”, and claims that it won’t work, but it works for me. Just don’t include any spaces or other weird characters in the new product name.
Step 6
Configure more target properties, resuming with the dialog we opened in Step 5. Scroll to the “GCC 4.2 – Language” group, and set the “Other C Flags” parameter to “-DLITE_VERSION”. (More precisely, I suppose, add “-DLITE_VERSION” to any other flags listed for that parameter, although it was blank in my case.)
This change will let you add things like this to your code:
#ifdef LITE_VERSION
	// Foo, bar, baz ...
#else
	// Quux, wibble ...
#endif
… and it’s code like this that lets you fork “Full” and “Lite” functionality out of the same codebase.
Step 7
You can control which resources are built into which version by right-clicking the resource, selecting “Get Info” from the context menu, going to the “Targets” tab, and selecting or deselecting the listed targets as appropriate. I don’t feel this level of control is worth the bother for most applications.
Step 8
The original article discusses swapping out your Default.png file during an additional build phase, but I don’t believe that this is relevant anymore. Launch images can now be selected by the UILaunchImageFile parameter in an Info.plist file, and I think that this is the mechanism you’d want to use if you needed to have specific launch images for your “Lite” and “Full” versions.
And Now, A Warning
The original article closes with this, which I reproduce for your edification:
Warning-Potential Weird Gotcha: Whenever I duplicate a target I notice that any Library Search Paths get slightly altered, so if you are using Library Search Paths and are getting strange errors, make sure you have the same values there in your Lite and Full version targets.
All Versions
There’s one little problem left in our happy, multi-target picture: You have to build each target individually, and it can be a hassle to do (and to remember to do) this. Xcode can help here, too.
To enable one-step building, first create a new “Aggregate” target. Right-click the “Targets” folder, select “Add” from the context menu, select “New Target …” from the second context menu, and then select the “Aggregate” template from the list of “Other” targets in the “Mac OS X” section of the “New Target” wizard.
Next, make the aggregate target dependent on the “Full” and “Lite” targets: Right-click the aggregate target, select “Get Info” from the context menu, go to the “General” tab, and add the dependencies. (You can read a bit about this here.)
Finally, set the aggregate target as the “Active Target” in the main window’s big “Overview” dropdown, and enjoy one-step builds.
