I’ve been playing around with Core Graphics/Quartz 2D image masks. They’re pretty neat, but a little obscure. Today I want to share a few things I wish I’d know when I started working with them.
Prototype
If you’re going to work with masks, you’re going to need to create them. (Note: This is only sort of true; you can also use ordinary images as masks … but let’s pass over that in relative silence.) Here is the prototype for CGImageMaskCreate():
CGImageRef CGImageMaskCreate (
        size_t width,
        size_t height,
        size_t bitsPerComponent,
        size_t bitsPerPixel,
        size_t bytesPerRow,
        CGDataProviderRef provider,
        const float decode[],
        int shouldInterpolate
);
There’s a lot to unpack out of this definition, as it’s far from clear what effect the various parameters will have on the mask that’s ultimately produced. To begin with generalities: width, height, bitsPerComponent, bitsPerPixel and bytesPerRow determine how a sequence of bytes is decoded into an image mask. The bytes themselves are pulled from provider, and the decode and shouldInterpolate parameters modify the overall process in some sort of vague way.
The width and height parameters are the simple ones; they respectively specify how many pixels are on each row of the mask, and how many rows make up the complete mask. The purpose of the decode parameter is obscure to me, and will remain so for this article; the documentation says little more than: “Typically a decode array is unnecessary, and you should pass NULL.” As for shouldInterpolate, in theory it controls whether or not an “edge-smoothing algorithm” is applied to the image mask, but in practice I haven’t observed it to have much effect. I usually set it to NO.
Rows
The bytes passed to CGImageMaskCreate() are decoded row-by-row, so in a sense bytesPerRow is the most important parameter. CGImageMaskCreate() assumes that each row begins bytesPerRow after the start of its predecessor, irrespective of the values of any other parameters.
A too-small bytesPerRow can cause bytes used at the end of one row to be reused at the start of another. For instance, if you create a 40-pixel wide mask from a byte stream at 8 bits per pixel and 35 bytes per row, the first 5 pixels of each row will be duplicates of the last 5 of its predecessor.
A too-large bytesPerRow can cause parts of the provided byte stream to be skipped. It also appears that spuriously large values for this and other parameters can cause “garbage” data to be read beyond the end of what provider can legitimately supply.
A word about row order: If you want your masks to work smoothly with CGContextRefs that have their coordinate system origin in the upper-left corner — e.g., those used in a drawRect: method — then you’ll want to order your rows such that the bottommost row appears first in the byte stream. If you’re working with CGContextRefs that have a coordinate system origin in the lower-left corner, the topmost row should appear first. (We talk a bit about how the byte stream is set up a little later on.)
Note that there do seem to be some limits on how goofy a value you can supply for bytesPerRow; at some point, CGImageMaskCreate() will begin to return nil. It’s not clear what those limits are, however.
Pixels
Once CGImageMaskCreate() has selected a byte at which to begin decoding a row, it reads width blocks of bitsPerPixel bits. Blocks are assumed to be tightly packed, may span bytes, are read most-significant-bit first, and are assigned to pixels from left to right. For instance, if reading 4 pixels at 12 bitsPerPixel from the following bytestream (low memory on the left):
0x12 0x34 0x56 0x78 0x9a 0xbcthen the 4 blocks would be, from left to right:
0x123 0x456 0x789 0xabcThe value of each pixel is computed by taking the bitsPerComponent most significant bits from its assigned block. (Note that bitsPerComponent must be 1, 2, 4, or 8.) If bitsPerPixel is greater than bitsPerComponent, the unused less-significant bits of each block are ignored. If bitsPerPixel is less than bitsPerComponent, CGImageMaskCreate() will return nil.
I think that the bitsPerComponent parameter has a slightly misleading name; masks are always grayscale entities, and don’t have color components. It’s not a huge deal (and the name is in fact defensible), but this function is confusing enough without introducing any additional head-scratchers.
Providers
Having talked about how a byte stream is parsed, the remaining question is: “Where does the byte stream come from?” The somewhat regrettable answer is: “A CGDataProvider“. CGDataProviders are data access abstractions in Core Graphics. While they strike me as slightly over-engineered, the good news is that some simple providers can be cooked up relatively easily.
For instance, if you want to wrap a data provider around the contents of a file, this is all you have to do:
NSString* fn = @"Some pathname goes here";
NSData* data = [NSData dataWithContentsOfFile:fn];
CGDataProviderRef provider = CGDataProviderCreateWithCFData((CFDataRef) data);

// … Interesting stuff happens here …

CGDataProviderRelease(provider);
Demo
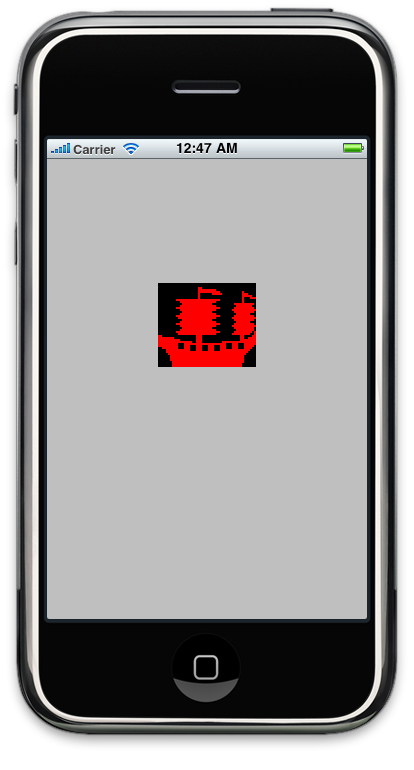
 Having covered all that, I’d like to present a quick demo. I’m going to take a bitmap, convert it to a mask, and use it render a custom view. Let’s begin by taking the GIF to the left, and processing it into a mask. We’ll use a little Python (and the awesome Python Imaging Library) to do the conversion:
import struct
import Image

mask = [(pixel<<7)^128 for pixel in Image.open('ship.gif').getdata()]
data = struct.pack('%dB'%len(mask), *mask)
file('ship.dat', 'wb').write(data)
Briefly, this works because ship.gif is a 2-color palletized image in which the "ship" pixels are set to 1, and the "background" pixels to 0. We store mask data in the high bit of each byte. (We could pack the mask 8 times more tightly, but that would just complicate things.) We invert (with the ^ operator) the mask bits because a mask of 0 allows paint through, while a mask of 1 does not. Note that the topmost row is stored first; we'll address that later.
Now, as for the app itself: Open up Xcode and create a "View-based Application". Add a MyMaskView class to the project; this should be a subclass of UIView. The only method we need to change is drawRect:, which should look something like this:
- (void)drawRect:(CGRect)rect
{
	// Get context
	CGContextRef context = UIGraphicsGetCurrentContext();

	// Setup mask, etc.
	NSData* data = [NSData dataWithContentsOfFile:[[NSBundle mainBundle] pathForResource:@"ship" ofType:@"dat"]];
	CGDataProviderRef provider = CGDataProviderCreateWithCFData((CFDataRef) data);
	CGImageRef mask = CGImageMaskCreate(98, 84, 1, 8, 98, provider, NULL, NO);

	// Adjust CTM s.t. the coordinate system follows CG LL conventions; o/w mask draws upside down
	CGContextTranslateCTM(context, 0, self.bounds.size.height);
	CGContextScaleCTM(context, 1, -1);

    	// Drawing code
	CGContextClipToMask(context, self.bounds, mask);
	CGContextSetFillColorWithColor(context, [[UIColor redColor] CGColor]);
	CGContextFillRect(context, self.bounds);

	// Release mask, etc.
	CGImageRelease(mask);
	CGDataProviderRelease(provider);

}
Please note that we flop context's Y-axis s.t. our top-row-first mask will render properly. Also, although this demo works in the "native" resolution of the mask (98x84) it isn't necessary to do so; CGContextClipToMask() will scale the mask to whatever CGRect you pass as its second argument.
Next, edit the main view controller's viewDidLoad method to create a MyMaskView subview:
- (void)viewDidLoad
{
    	[super viewDidLoad];

	MyMaskView* v = [[[MyMaskView alloc] initWithFrame:CGRectMake(111, 124, 98, 84)] autorelease];
	[self.view addSubview:v];
}
The last step is to add the ship.dat file to the project. Build it and run it, and hey presto, we're done. You can download the whole project here.
Why
All this might seem like a bit of a long drive for a short day at the beach. "Why not just use UIImages?", you might well ask. Well, for one thing, if you create a more interesting data provider -- with CGDataProviderCreateWithData(), for instance -- you can easily adjust the mask at runtime. Given the art I used in this demo, you can probably guess what I'm planning to do with that.

Pingback: Things that were not immediately obvious to me » Blog Archive » Taipan! Update